Running Falcon 180B on Vast
When it comes to Falcon 180B, the epic new LLM set loose on the world by the folks at The Technology Innovation Institute (TII), you can’t be shy with the hardware!
This model is a beast - it is trained on more than 3 trillion tokens - mostly coming from TII’s “RefinedWeb” dataset.
The “180B” in the name hints at the incredible size and power of this model. While the B doesn’t stand for beast - it does reflect the 180 billion neural network parameters it uses.
That’s a lot. And it takes serious GPU RAM and computing power to operate.
This is where Vast.ai comes in. With Vast.ai you can rent the GPU power you need to run immense models like Falcon 180B.
So to get you up and running we’ll walk step by step through just how to get Falcon 180B running with Vast.ai. We will show you how to do it with the Web UI as well as directly with SSH.
In both cases - you’ll want to purchase some credits prior to starting, so that you will be able to run your instances.
Use the Web UI to run the model!
Step 1: Select the template you would like to use.
Click templates on the menu on the left hand side of the screen (expanding it with the “hamburger” icon on the top left if necessary).
From the template list, find the “Oobabooga” template and select it. This will run a simple webui for downloading, loading and chatting with the Falcon 180B model.
.png)
Step 2: Select enough storage
Move the storage slider over to allocate storage for the instance. Storage can only be set before the instance is created, so this is an important step.
Falcon 180B requires differing amounts of storage depending on the quantization method you select.
We recommend at least 100GB for the model we recommend.
Step 3: Find an appropriate machine - and click the Rent button to start it.
Falcon 180B requires a lot of GPU VRAM. With no quantization, the LLM requires ~640GB of GPU VRAM!
With quantization, the amount of GPU VRAM is reduced. However, the model quality degrades when more quantization is used. It is a balance. We recommend the Bloke’s quantized models - https://huggingface.co/TheBloke/Falcon-180B-Chat-GPTQ#provided-files-and-gptq-parameters
The linked chart shows the tradeoff between more quantization and quality. At the high end, the server will need 94.25 GB of GPU VRAM. On the low end, 70.54 GB.We recommend the main branch which uses 4 bit quantization and requires 95 GB of GPU VRAM along with 100 GB of disk space.
This will fit in a variety of configurations. You could use a 2X A6000/A40 or a 4X 3090/4090/A5000. The total GPU RAM needs to be over 95GB.
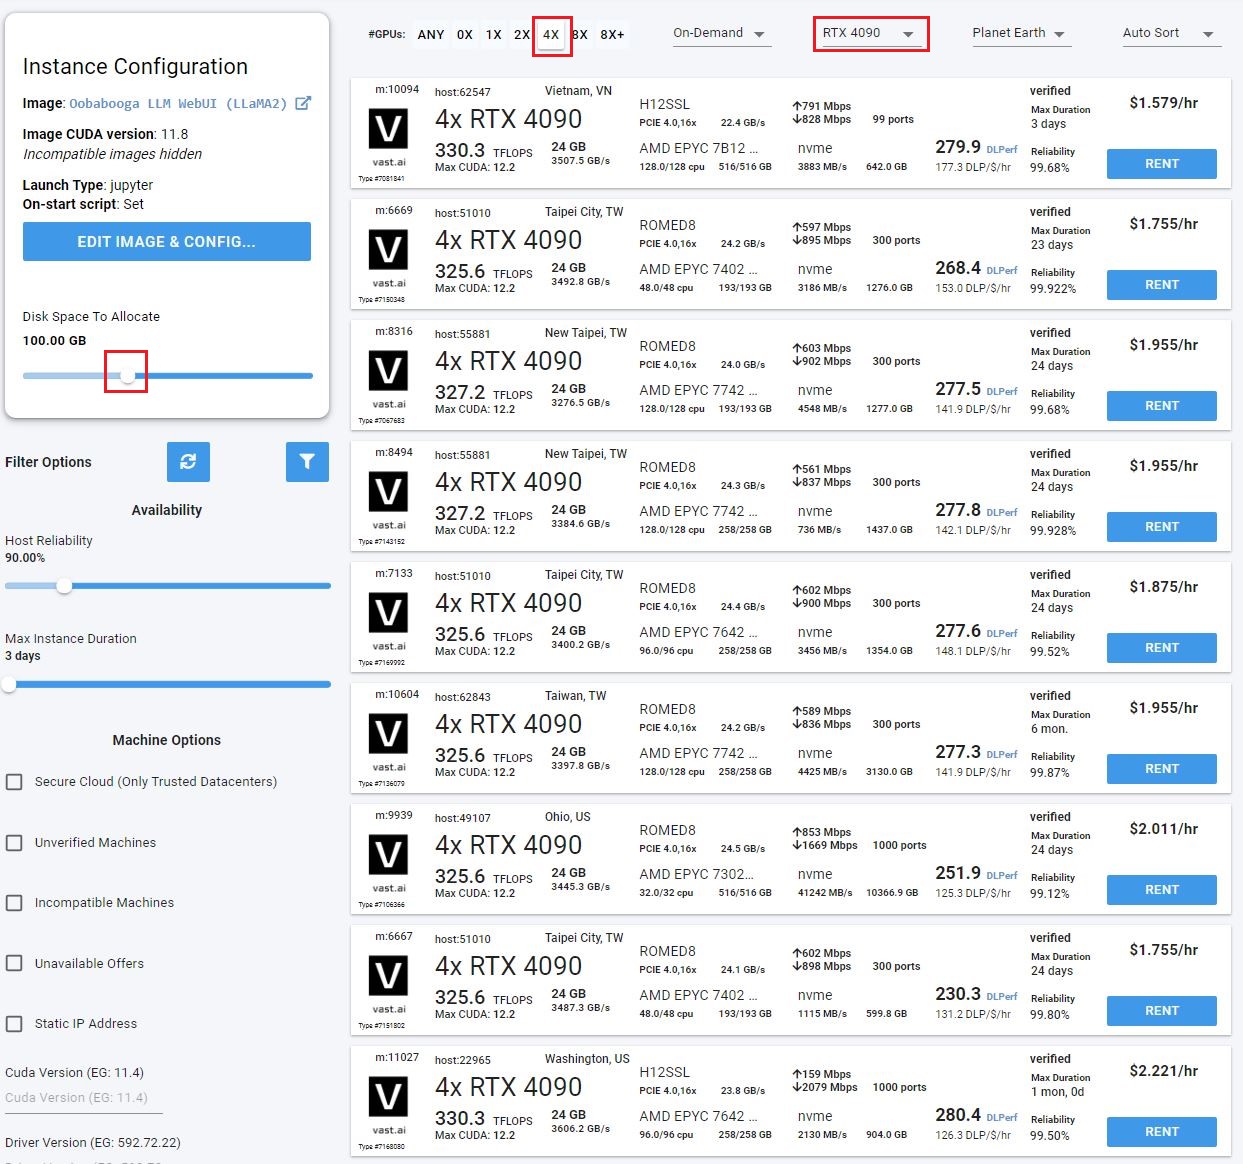
Click the blue rent button to create and launch your instance.
Step 3: Open the Web UI & download the model.
On the instance screen, once your instance has started, there will be a button labeled “Open” - this will take you to the Web UI.
Once the Web UI has loaded, on the top of the screen there will be a menu. Select “Model” from that menu.
On the right hand side of the screen there will then be a text box for downloading the model.
Enter the following: TheBloke/Falcon-180B-Chat-GPTQ
Press the Download button. This will take some time.
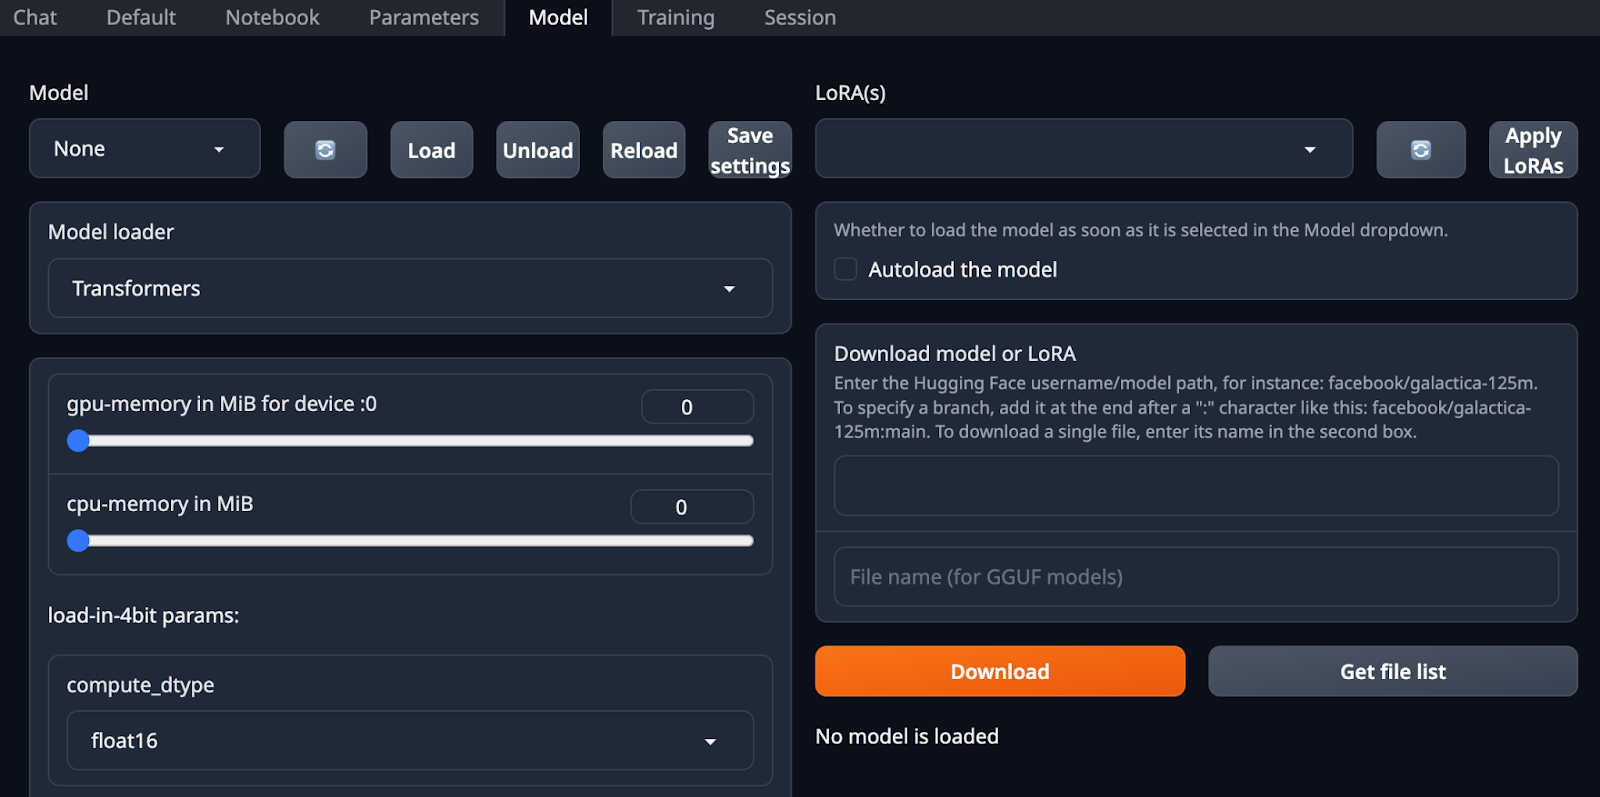
Step 4: Load the model.
Slide all of the GPU memory sliders all the way to the right, so that you’re allocating all available memory to the model.
Once the download is complete the model will be listed in the drop down to the upper left. Select it and click load.
Step 5: Use the model.
Click chat on the top menu. This will take you to a chat interface - you can now interact with the model in the familiar way.
Use SSH to run the model!
An alternative way to run the model is to use SSH.
Step 1: Set up your SSH access.
Ultimately this boils down to two things:
- Generating your key pair.
- Putting your public key on your account.
Some of this is platform specific - but detailed assistance can be found here: https://vast.ai/docs/instance-setup/ssh
Step 2: Select the Oobabooga template.
Follow the same steps that as in Step 1 from the Web UI instructions
Step 3: Find an appropriate machine - and click the Rent button to start it.
Follow steps 2 & 3 above to select an appropriate GPU server and match the total GPU VRAM with the size of the quantized model you want to run. Approximately 100GB of total VRAM should work.
Step 4: SSH to the instance.
Once the instance has started - click the “connect to” button. This will bring up a screen that has SSH details - copy those to your terminal and execute them.
Step 5: Install packages & Execute example Python code.
pip3 install transformers>=4.33.0 optimum>=1.12.0 pip3 install auto-gptq --extra-index-url https://huggingface.github.io/autogptq-index/whl/cu118/ # Use cu117 if on CUDA 11.7
At the command line for your instance (which you’ve SSH’d to) execute the following:
Python

from transformers import AutoModelForCausalLM, AutoTokenizer, pipeline

model_name_or_path = "TheBloke/Falcon-180B-Chat-GPTQ"

model = AutoModelForCausalLM.from_pretrained(model_name_or_path,
                                             device_map="auto",
                                             revision="gptq-3bit--1g-actorder_True")

tokenizer = AutoTokenizer.from_pretrained(model_name_or_path, use_fast=True)

prompt = "Tell me about dogs"
prompt_template=f'''User: {prompt}
Assistant: '''

print("\n\n*** Generate:")

input_ids = tokenizer(prompt_template, return_tensors='pt').input_ids.cuda()
output = model.generate(inputs=input_ids, do_sample=True, temperature=0.7, max_new_tokens=512)
print(tokenizer.decode(output[0]))
This sample code is from “TheBloke’s” Hugging Face card, at https://huggingface.co/TheBloke/Falcon-180B-Chat-GPTQ. It shows the system operating - though I’m sure you have many ideas on more interesting things to do with it, once you get it running.
Wrapping Up
So there you have it - quickly, painlessly spinning up the powerful Vast.ai platform and executing a cutting edge large language model. So whatever your AI use-case is, you can now be confident that you can make it a reality with minimal effort.


