Docs - Use Cases
Windows SSH Guide
Most machine learning and AI programming is done on Linux. We recommend biting the bullet and installing a Linux subsystem on your Windows machine, like WSL. You can then access the Vast CLI tooling and SSH into your Vast instance with regular Linux SSH keygen and connect commands.
Windows Powershell #
Windows offers typical SSH access through the Powershell. The typical SSH linux commands will work in the Powershell.
Step 1 - Open the Windows Powershell terminal #
Click on the search bar in the bottom right and type in Powershell. Click on the Windows Powershell icon to open up a new session.
Step 2 - Run the SSH Key generation command if you do not already have a default ssh key (id_rsa) #
Run the ssh key generation command in the terminal.
ssh-keygen -t rsaYou will be prompted to enter a file in which to save the key. Hit enter to save in the default directory. You will then be prompted for a passphrase. For simplicity, hit enter to for no passphrase.
Next you will need to copy the contents of the public SSH key to paste into your Vast account. Use the following command to output the public key and copy it to your clipboard:
Get-Content $env:USERPROFILE/.ssh/id_rsa.pub | Set-ClipboardStep 3 - Add SSH Key To Account #
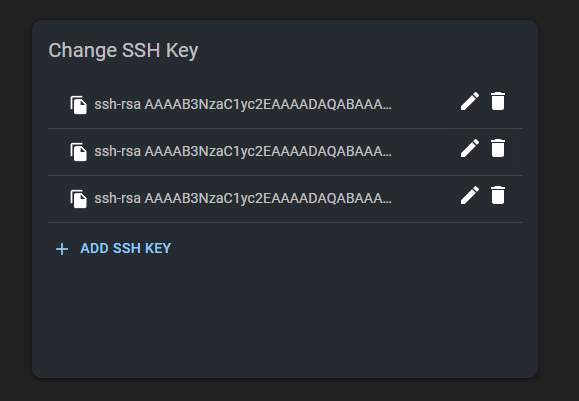
Navigate to the account page of Vast and go to the Change SSH Key section. There you can add the ssh key you just generated to your account.
Any instances you create will now have your ssh key attached to the instance. This only applies to new instances. Existing instances will NOT have your ssh key and you will have to add it manually to the instance.
Step 4 - Find the SSH connection string #
Go to the instances page and look for a bright blue button that says 'Open SSH Interface' on the instance card.
Click it and you should see a screen similar to this:
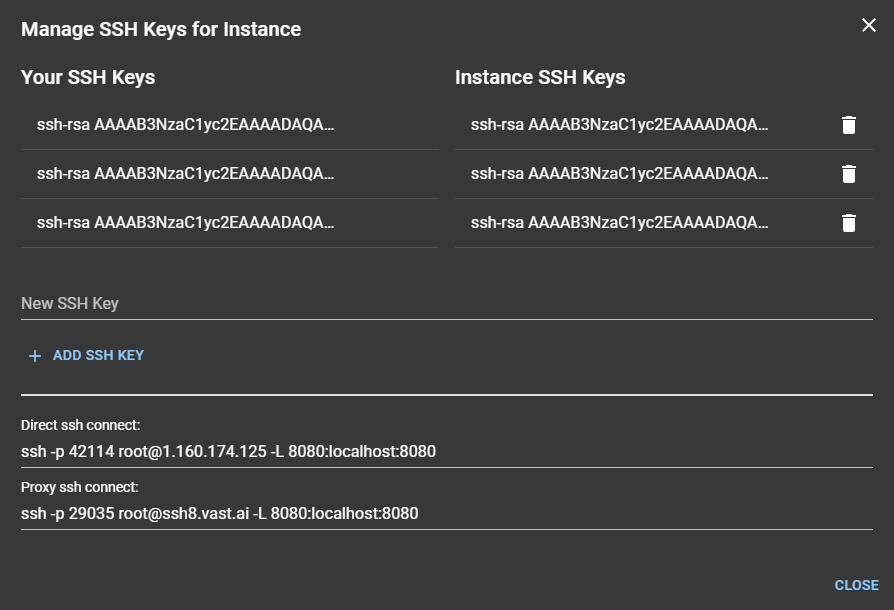
The connecting string we want is
ssh -p 42114 root@1.160.174.125 -L 8080:localhost:8080
Find that string for the instance you want to SSH into. Copy it to your clipboard.
Step 5 - Connect via Powershell #
Copy the SSH connection string into Powershell. When it prompts you for anything just say 'yes'.
If you see yourself logged into a vast.ai container you have connected successfully!
Windows Putty Guide #
Another method on Windows is to use Putty tools. It is typically harder to use than Powershell.
Here is a video guide for those who prefer a video walkthrough.
The Tools #
Puttygen.exe: A key generator used to create an RSA keypair
Putty.exe: The SSH client used to connect to the instance
Winscp: A GUI for scp to allow for file transfer to/from the instance
Step 1 - Establish SSH Keys #
Start by downloading and running the appropriate version of Puttygen.exe.
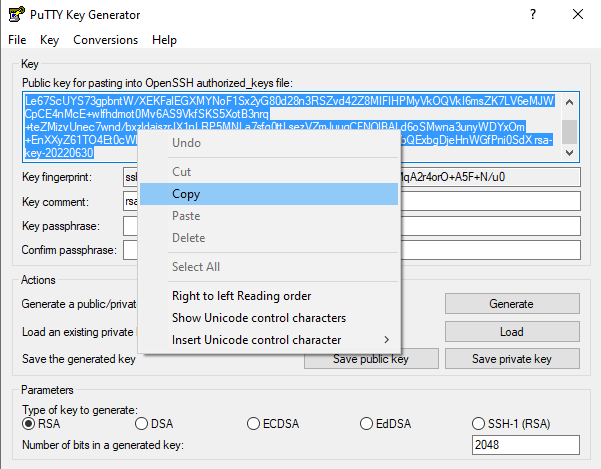
Make sure that the RSA key type is selected and then hit the "Generate" button. You will move your mouse cursor around to generate some randomness for the key. Then select the entire Public key (double check you get every character starting with ssh) and copy it to the clipboard like this:
Now login to your Vast account. Paste the contents of your clipboard in the "Change SSH Key" section and hit the blue SET SSH KEY button. Your new SSH key is now set for all new instances and will be propagated to running instances after 15ish minutes.
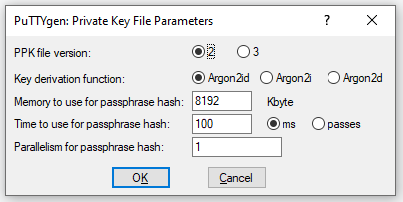
Go back to Puttygen. You will need to change the key format before you can save the private key. At the top level menu select Key->Parameters for saving key files. That will pop up the dialog. Change the PPK file version to 2. Hit OK to save the change.
Now you can hit the "Save private key" button to save your private key into a local folder. Ignore the passphrase warning. Remember where you store the key as you will need to specify the path to the key when using Putty.
Step 2 - SSH into a Vast instance #
Now that you have your SSH keys setup, it is time to rent an instance. First make sure you have added credits to your account. Then go to the create instance page and click on the Edit Image & Config in the upper left of the interface to specify the OS Image and type.
Typical OS Images such as Pytorch are preloaded. Select an empty template slot to use a custom OS Image. Pick if you want Jupyter installed or to run it as an SSH instance. Then select if you want direct connections are not. While direct connections are faster, you will limit the machines you see to ones only with open ports. Use the rest of the filters to search for GPU type, number of GPUs and other machine specifics.
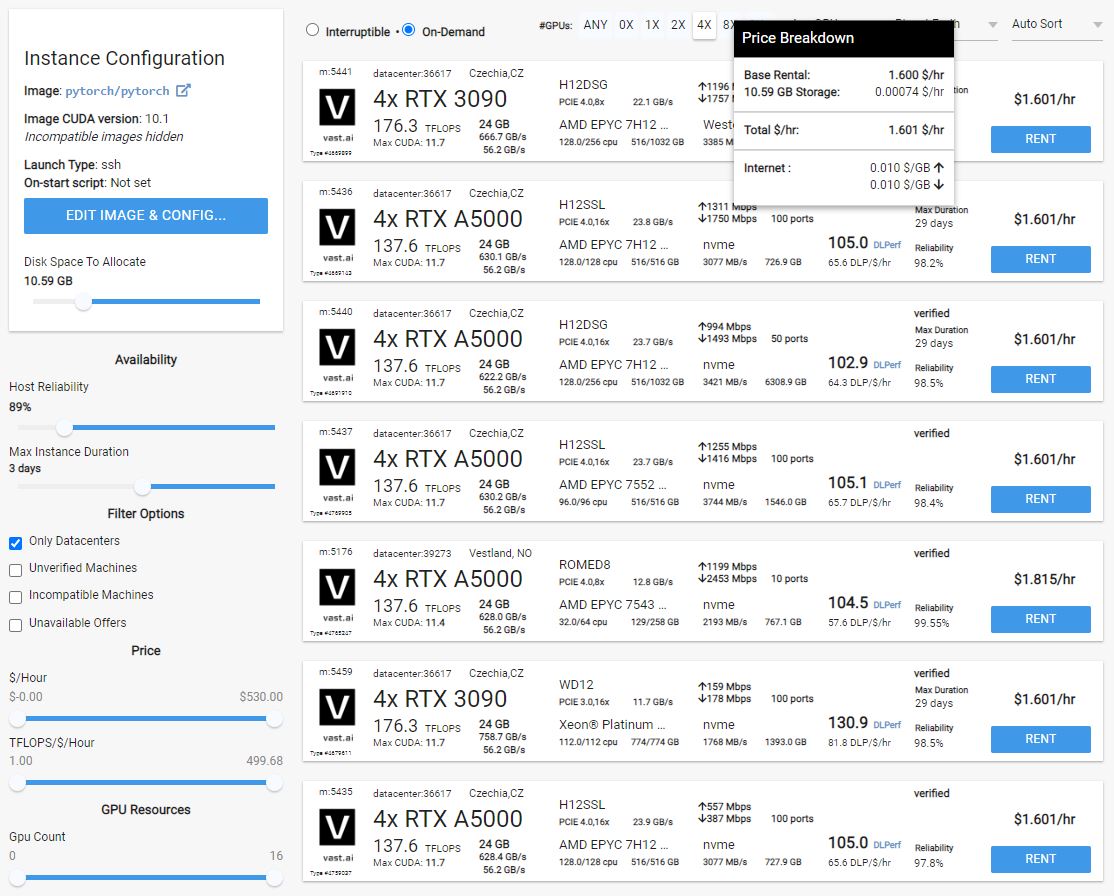
Once you find a machine you like and rent it, the OS Image will start to load on it. Afterwards you will get connection information for the proxy connection only or both the proxy and direct. You will need the port number, which appears after the -p and the hostname.
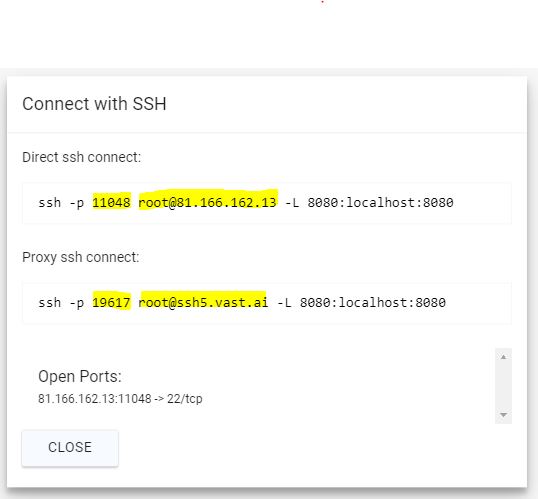
Open up Putty.exe. You can then entire the hostname and port into the Putty client.

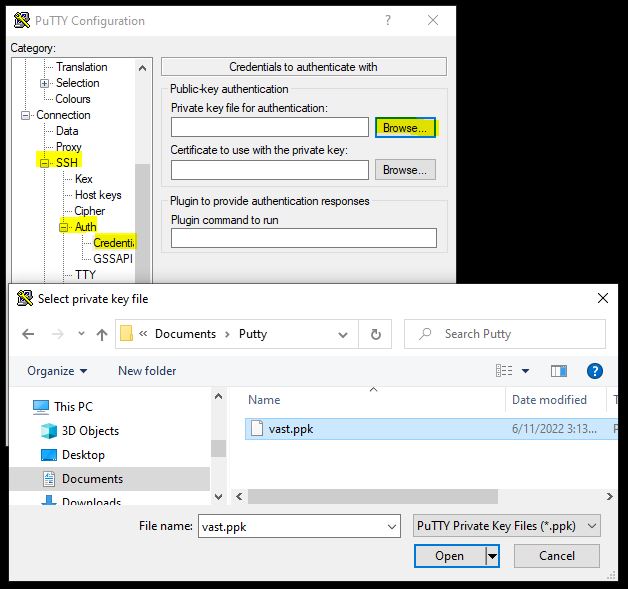
You will also need to select your private key file, by selecting SSH->Auth->Credentials on the left hand menu and then select your key file that you saved in step 1.
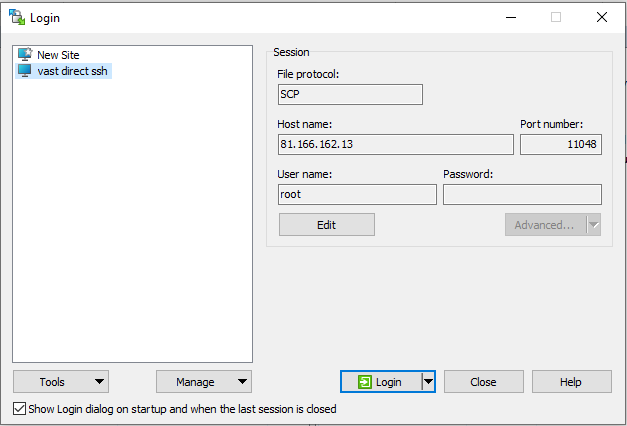
The final step is to save your session information. Navigate back to the session information pane, type in a name in the Saved Session box and then hit Save. Your keypath, hostname and IP address should now all be saved under that name and will be readable by WinSCP.
After saving the key it is easy to hit the Open button which will connect Putty. However once you close that session, the session information is lost. Navigate back to the Session tab and save the session before opening the connection.
Hit open to open up your SSH connection. The terminal will ask to add the key fingerprint (type yes) and then connect to the instance. You are in!
Step 3 - WinSCP for file transfer #
The final tool you will want to use with Windows is WinSCP.
If you saved your session information in Putty, the setup is trivial in WinSCP. It will simply import your Putty session information and then allow you to connect to that instance!
Make sure to change the File Protocol from "SFTP" to "SCP" to use SCP to transfer the file. If the login information isn't saved, use the same IP and port number used for Putty above along with the user name "root" as seen below.
Hit the Login button to authenticate with the instance and then start transferring files by dragging them and dropping them between your local machine and the instance.
Let us know if you found this guide helpful and how we could improve.