Docs - Data Management
Data Movement
Vast.ai currently supports several built-in mechanisms to copy data to/from instance storage (in addition to all of the standard linux/unix options available inside the instance):
For docker based instances:
- Instance<->Instance and Instance<->Local copy using the
vastai copyCLI command - Instance<->Instance copy in the GUI instance control panel or
vastai copyCLI command - Instance<->Cloud copy using the GUI instance control panel or
vastai cloud copyCLI command
For VM instances:
- Instance<->Instance migration through the
vastai vm copyCLI command or the GUI instance control panel
These are in addition to standard ssh based copy protocols such as scp or sftp which you can run over ssh, built in jupyter http copy, and any other linux tools you can run inside the instance yourself (rclone, rsync, bittorent, insync etc).
The 3 built-in methods discussed here are unique in that they offer ways to copy data to/from a stopped instance, with some constraints. Copying data between instances accrues internet bandwidth usage charges (with prices varying across providers), unless the copy is between two instances on the same machine or local network, in which case there is no bandwidth charge.
Instance<->Cloud copy (cloud sync) (Docker) #
The cloud sync feature allows you to copy data to/from instance local storage and several cloud storage providers (S3, gdrive, backblaze, etc) - even when the instance is stopped.
using the GUI #
Vast currently supports Dropbox, Amazon S3 and Backblaze cloud storage providers.
First you will need to connect to the cloud provider on the account page and then use the cloud copy button on the instance to start the copy operation.

See Cloud Sync for more details.
Using the CLI #
You can also access this feature using the vastai cloud copy CLI command.
Instance <-> Instance copy #
Instance to instance copy allows moving data directly between the local storage of two instances. For this method the destination instance (but not the source) currently must be running.
If the two instances are on the same machine or the same local network (same provider and location) then the copy can run at faster local network storage speeds and there is no internet transit cost.
Using the GUI #
You can use the copy buttons to copy data between two instances. The source instance can be stopped/inactive. The destination instance will need to have open port mappings and be active. See complete constraints below.
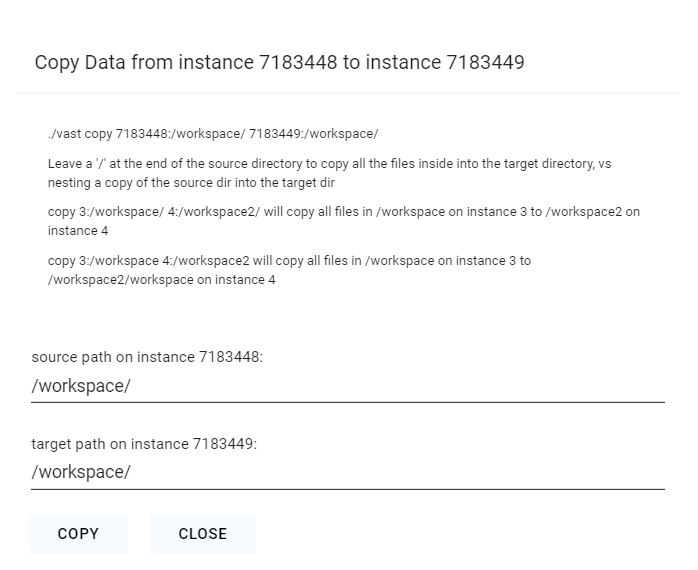
Click the copy button on the source instance and then on the destination instance to bring up the copy dialogue. For docker-based instances you will see the following folder dialogue.
Pick the folders where you want to copy to/from. Leave a '/' at the end of the source directory to copy all the files inside into the target directory, vs nesting a copy of the source dir into the target dir.
You should not copy to /root or / as a destination directory, as this can mess up the permissions on your instance ssh folder, breaking future copy operations (as they use ssh authentication).
After clicking the copy button, give it 5-10 seconds to start. The status messages will display as the copy operation begins.
For VM based instances you will see a confirmation dialog instead; the copy will copy your entire source instance to the destination machine. The destination instance's disk will be replaced by the contents of the source instance.
CLI Copy Command (Docker) #
You can use the CLI copy command to copy from/to directories on a remote instance and your local machine, or to copy data between two remote instances. The copy command uses rsync and is generally fast and efficient, subject to single link upload/download constraints.
Example:
./vast copy ~/workspace 4330147:/workspaceThat will copy the local ~/workspace (workspace folder of current user home directory) into the absolute path /workspace on instance 4330147.
CLI Copy Command (VMs) #
You can use the CLI vm copy command to copy your entire VM from one instance to another. The destination VM's disk will be replaced with the contents of the source machine.
Example:
./vast vm copy 1241241 1241245This will transfer the contents of 1241241 to 1241245.
Constraints #
For VM-based instances, the destination instance must be stopped during the transfer.
You should not copy to /root or / as a destination directory, as this can mess up the permissions on your instance ssh folder, breaking future copy operations (as they use ssh authentication).
Performance #
If your data is already stored in the cloud (S3, gdrive, etc) then you should naturally use the appropriate linux CLI or commands to download and upload data directly, or you could use the cloud sync feature. This generally will be one the fastest methods for moving large quantities of data, as it can fully saturate a large number of download links. If you are using multiple instances with significant data movement requirements you will want to use high bandwidth cloud storage to avoid any single machine bottlenecks.
If you launched a Jupyter notebook instance, you can use its upload feature, but this has a file size limit and can be slow.
You can also use standard Linux tools like scp, ftp, rclone, or rsync to move data. For moving code and smaller files scp is fast enough and convenient. However, be warned that the default ssh connection uses a proxy and can be slow for large transfers (direct ssh recommended).
Instance to instance copy is generally as fast as other methods, and can be much faster (and cheaper) for moving data between instances on the same datacenter.
SCP #
If you launched an ssh instance, you can copy files using scp. The proxy ssh connection can be slow (in terms of latency and bandwidth). Thus we recommend only using scp over the proxy ssh connection for smaller transfers (less than 1 GB). For larger inbound transfers, using the direct ssh connection is recommended. Downloading from a cloud data store using wget or curl can have much higher performance.
The relevant scp command syntax is:
scp -P PORT LOCAL_FILE root@IPADDR:/REMOTEDIRThe PORT and IPADDR fields must match those from the ssh command (note the use of -P for port instead of -p !). The "Connect" button on the instance will give you these fields in the form:
ssh -p PORT root@IPADDR -L 8080:localhost:8080For example, if Connect gives you this:
ssh -p 7417 root@52.204.230.7 -L 8080:localhost:8080You could use scp to upload a local file called "myfile.tar.gz" to a remote folder called "mydir" like so:
scp -P 7417 myfile.tar.gz root@52.204.230.7:/mydirCommon Questions #
How do you recommend I move data from an existing instance? #
The cloud sync feature will allow you to move data to and from instances easily. The main benefit is that you can move data around while the machine is inactive. Currently, we support Google Drive, S3, Dropbox, and Backblaze
Help, I want to move my data but I forgot what directory it's in! #
For moving your data, by either using our Cloud Sync or Instance Copy features, you will need to define the path from where the data you are transferring is coming from and where it is to be put. If you don't remember where the data is you are trying to transfer, you can use our CLI execute command to access your instance when your instance access is limited.